上两篇笔记把 OAuth 2.0 基本的理论知识都介绍了一下,在本篇笔记中,就让我们一起来实现一个 OAuth 2.0 服务器吧,简单起见,这个服务器既承担资源服务器的角色,也承担授权服务器的角色。
我们使用 Spring Security 作为底层支持。Spring Security 是 Spring 全家桶中提供的与安全相关一套框架。它对一般 Web 应用都需要的认证和授权这一块的功能进行了封装,使得在一个 Spring 项目中可以非常简便又灵活地根据自身的安全性需求搭建出一套认证和授权流程。
Spring Security OAuth 则是 Spring Security 提供的对 OAuth 的支持( OAuth 1 和 OAuth 2 都支持)。
Step 1 - 创建项目
首先,我们要创建一个 Spring boot 项目,把如下 dependency 加进去:1
2
3
4
5
6
7
8
9
10
11
12<dependency>
<groupId>org.springframework.boot</groupId>
<artifactId>spring-boot-starter-security</artifactId>
</dependency>
<dependency>
<groupId>org.springframework.boot</groupId>
<artifactId>spring-boot-starter-web</artifactId>
</dependency>
<dependency>
<groupId>org.springframework.security.oauth.boot</groupId>
<artifactId>spring-security-oauth2-autoconfigure</artifactId>
</dependency>
启动类:1
2
3
4
5
6
7
8
public class Application {
public static void main(String[] args) {
SpringApplication.run(Application.class, args);
}
}
Step 2 - Web Security 配置
简单起见,我们配置了 In Memory 的用户认证方式,同时配置对请求的访问控制。这一步就是一般的 Spring Security 相关的配置。
配置如下:1
2
3
4
5
6
7
8
9
10
11
12
13
14
15
16
17
18
19
20
21
22
23
24
25
26
27
28
29
30
31
32
33
34
35
public class SecurityConfig extends WebSecurityConfigurerAdapter {
protected void configure(AuthenticationManagerBuilder auth) throws Exception {
auth.inMemoryAuthentication()
.withUser("alice")
.password(passwordEncoder().encode("alice"))
.roles("USER");
}
public PasswordEncoder passwordEncoder() {
return new BCryptPasswordEncoder();
}
protected void configure(HttpSecurity http) throws Exception {
// @formatter:off
http.authorizeRequests()
.antMatchers("/login").permitAll()
.anyRequest().hasRole("USER")
.and()
.formLogin()
.and()
.csrf().disable();
// @formatter:on
}
public void configure(WebSecurity web) {
web.ignoring().antMatchers("/webjars/**", "/images/**", "/js/**", "/css/**");
}
}
我们知道 OAuth 2.0 中包含了两类服务器角色,一个是授权服务器,一个是资源服务器。针对这两类角色,Spring Security OAuth 分别提供了单独的启动和配置接口。
Step 3 - 授权服务器配置
通过使用 @EnableAuthorizationServer 注解,并实现 AuthorizationServerConfigurer 接口以完成授权服务器的配置,可以将应用实现为一个授权服务器。
在上文中,我们提到作为授权服务器,需要开放两个端点(Endpoint),一个用于获取授权,一个用于获取 Access Token。基于 Spring Security OAuth 实现的默认URL分别是:
- AuthorizationEndpoint -
/oauth/authorize - TokenEndpoint -
/oauth/token
AuthorizationServerConfigurer 接口提供了三个配置方法,作用如下:
- AuthorizationServerSecurityConfigurer- 用于配置授权服务器自身的安全,其实主要就是针对
/oauth/token这个接口的保护 - AuthorizationServerEndpointsConfigurer - 用于配置一些服务器需要的非安全的内容,比如服务器的 Token Store, 支持哪些授权类型等等
- ClientDetailsServiceConfigurer - 用于配置客户端信息(id, secret, grant_type 等信息),要求至少配置一个客户端。默认不支持 Resource Owner Password 授权类型,如果要使用该类型,需要在
AuthorizationServerEndpointsConfigurer中提供AuthenticationManager用于用户认证。
org.springframework.boot.autoconfigure.security.oauth2.authserver.OAuth2AuthorizationServerConfiguration 提供了完整的默认授权服务器配置,如果为应用加上了 @EnableAuthorizationServer 注解但没有提供自定义的配置,那么就会使用这个默认配置,为了满足必须至少有一个客户端信息的要求,这个配置在应用启动时会生成一组 client-id 和 client-secret。
回到我们的项目,我们选择添加自定义的配置,那么这些配置将会覆盖默认配置。
配置如下:1
2
3
4
5
6
7
8
9
10
11
12
13
14
15
16
17
18
19
20
21
22
23
24
25
26
27
28
29
30
31
32
33
34
35
36
37
38
39
40
41
public class AuthorizationServerConfig extends AuthorizationServerConfigurerAdapter {
private PasswordEncoder passwordEncoder;
private AuthenticationManager authenticationManager;
private TokenStore tokenStore;
public void configure(ClientDetailsServiceConfigurer clients) throws Exception {
clients.inMemory()
.withClient("foo")
.secret(passwordEncoder.encode("secret"))
.scopes("read", "write")
.authorizedGrantTypes("password", "authorization_code", "refresh_token", "implicit")
.redirectUris("http://localhost:8081/foo");
}
public void configure(AuthorizationServerEndpointsConfigurer endpoints) throws Exception {
endpoints.tokenStore(tokenStore)
.authenticationManager(authenticationManager);
}
public void configure(AuthorizationServerSecurityConfigurer security) throws Exception {
security.tokenKeyAccess("permitAll()")
.checkTokenAccess("isAuthenticated()");
}
public TokenStore tokenStore() {
return new InMemoryTokenStore();
}
}
在上面的配置中,我们通过 ClientDetailsServiceConfigurer 创建了一个客户端,配置了它的 id, secret, scopes,grant types 和 redirect uri。
另外,为了使用 password 授权类型,我们通过 AuthorizationServerEndpointsConfigurer 配置了 authenticationManager。
同时,我们把 /oauth/token 这个 endpoint 完全开放,方便我们使用 password 授权。
在这个类中,passwordEncoder 和 authenticationManager 都是以 @Autowired 的形式注入进来的,这是因为这两个类我都已经在 SecurityConfig 中声明为 Bean 了,这部分的代码如下:
1 | // SecurityConfig.java |
Step 4 - 资源服务器配置
通过使用 @EnableResourceServer 注解,并实现 ResourceServerConfigurer 接口以完成授权服务器的配置,可以将应用实现为一个资源服务器。
资源服务器通过验证 Access Token 保护对资源的访问。因此,资源服务器最主要的配置内容就是访问控制。
在 ResourceServerConfigurer 中提供了两个配置方法:
- ResourceServerSecurityConfigurer - 用来配置所有跟资源服务器相关的内容,比如
ResourceServerTokenServices,resourceId等。ResourceServerTokenServices- 对 Access Token 的解析和验证是由授权过程中非常重要的另一半工作,资源服务器将这部分工作交给ResourceServerTokenServices来做。对于资源服务器和授权服务器是同一台服务器的情况,我们基本不需要做额外的配置,Spring Security OAuth 默认注册了一个DefaultTokenServices实例。如果资源服务器和授权服务器不是同一台,那么我们就需要自己配置合适的ResourceServerTokenServices以保证资源服务器能“正确理解”授权服务器生成的 Access Token。RemoteTokenServices是 Spring OAuth 提供的一个替代方式,它使得资源服务器可以向授权服务器发送一个/oauth/check_token请求来验证和解析 Access Token。
- HttpSecurity - 用来配置对资源的访问控制规则。默认设置下,所有非
/oauth/**路经下的资源都是被保护的。
示例项目的资源服务器配置如下:1
2
3
4
5
6
7
8
9
10
11
12
13
14
15
16
17
18
19
20
21
22
23
24
25
26
27
public class ResourceServerConfig extends ResourceServerConfigurerAdapter {
private static final String DEMO_RESOURCE_ID = "demo";
public void configure(ResourceServerSecurityConfigurer resources) throws Exception {
resources.resourceId(DEMO_RESOURCE_ID).stateless(false);
}
public void configure(HttpSecurity http) throws Exception {
// @formatter:off
// Since we want the protected resources to be accessible in the UI as well we need
// session creation to be allowed (it's disabled by default in 2.0.6)
http.sessionManagement()
.sessionCreationPolicy(SessionCreationPolicy.IF_REQUIRED)
.and()
.requestMatchers()
.antMatchers("/api/**")
.and()
.authorizeRequests()
.antMatchers("/api/**").access("#oauth2.hasScope('read') or (!#oauth2.isOAuth() and hasRole('ROLE_USER'))");
// @formatter:on
}
}
我们对 /api/** 路经下的资源进行了保护,只有拥有 read scope 的客户端才被允许访问。
Step 5 - 初见成果
到此为止,我们实现基本工作就都完成了,此时启动应用,它就是一个运行中的授权兼资源服务器,默认运行在 localhost:8080。
Resource Owner Password 授权
敲入如下命令,我们就可以以 Resource Owner Password 授权的方式来获得 Access Token:
1 | curl -X POST \ |
authorization: Basic Zm9vOnNlY3JldA== 头部中包含的就是我们在授权服务器中注册的客户端的 id 和 secret。
返回结果如下图所示: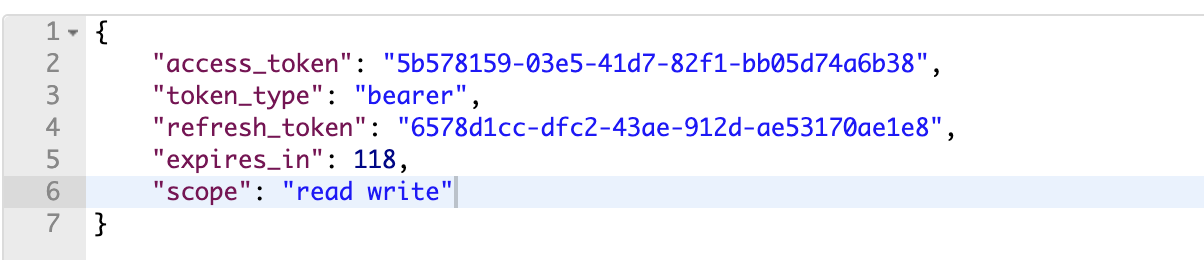
接下来,我们就可以将返回的 Access Token 放到请求的 Authorization 首部,以 Bearer Token 的形式来访问资源: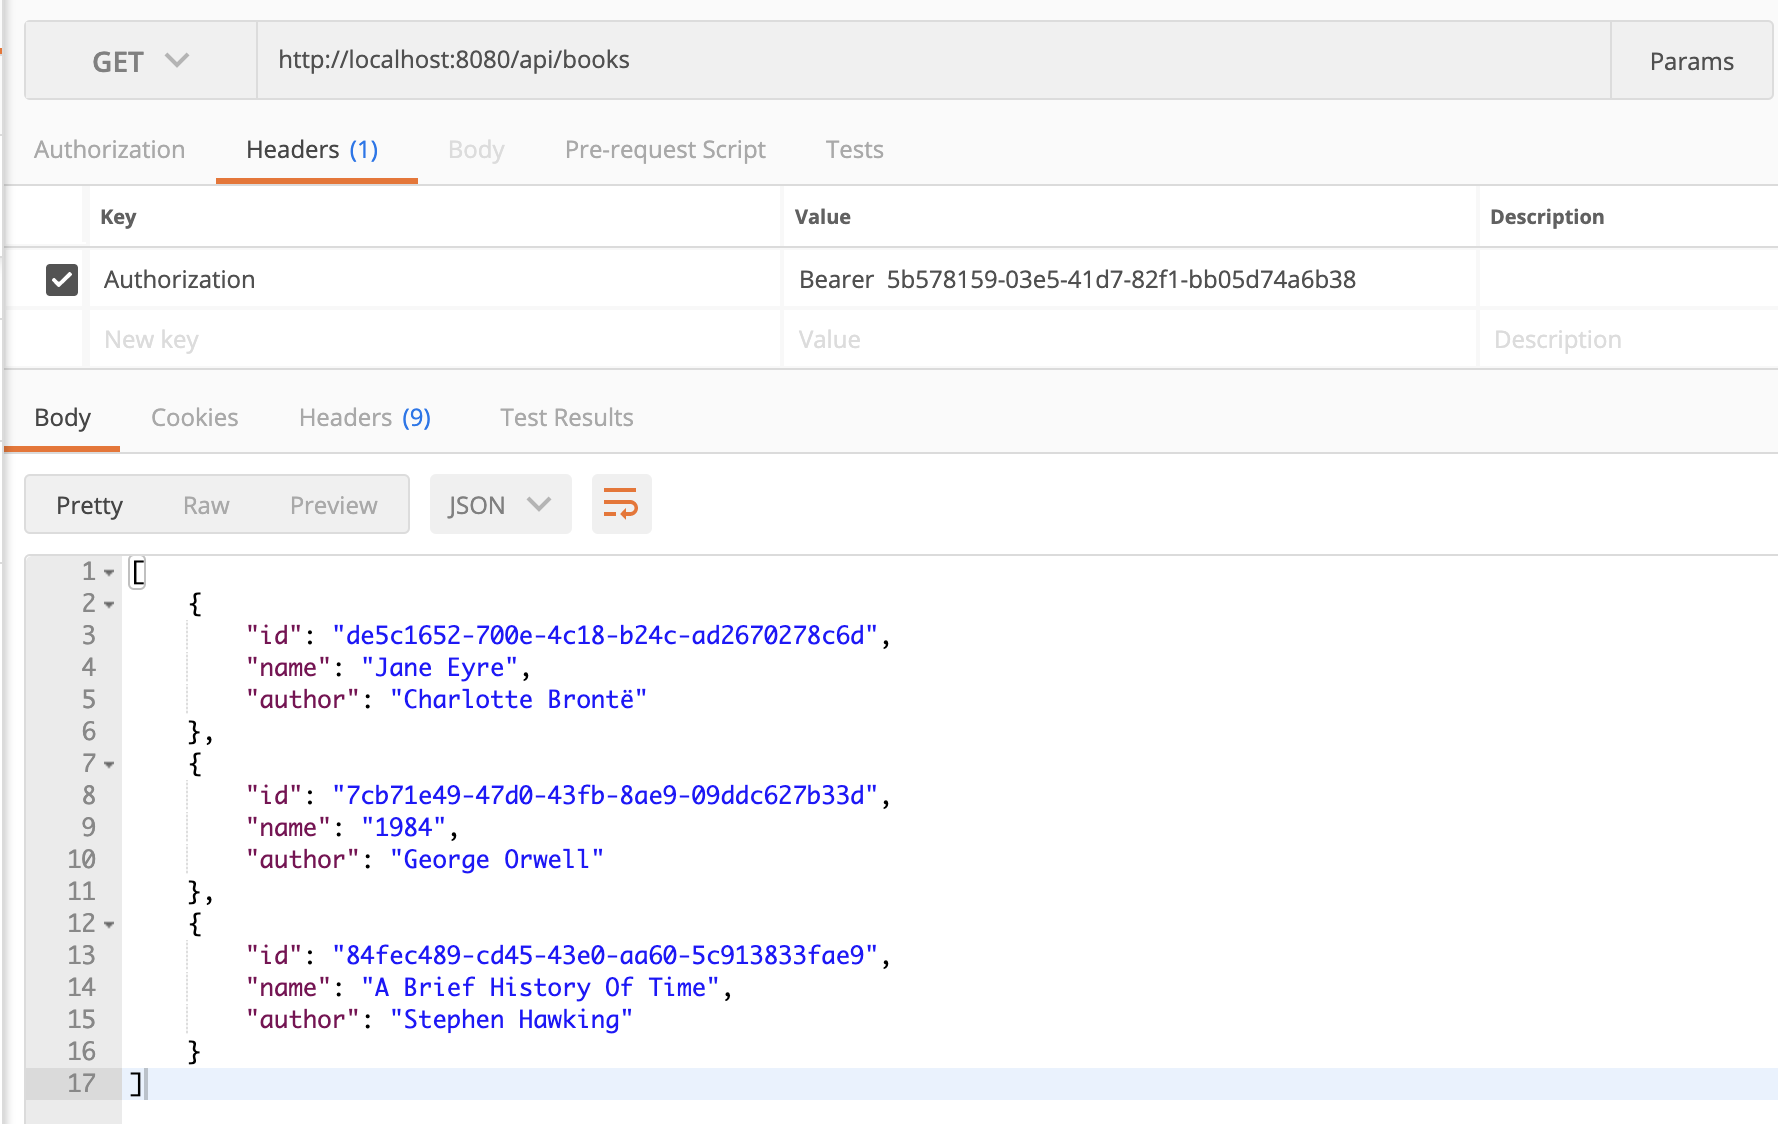
Authorization Code 授权
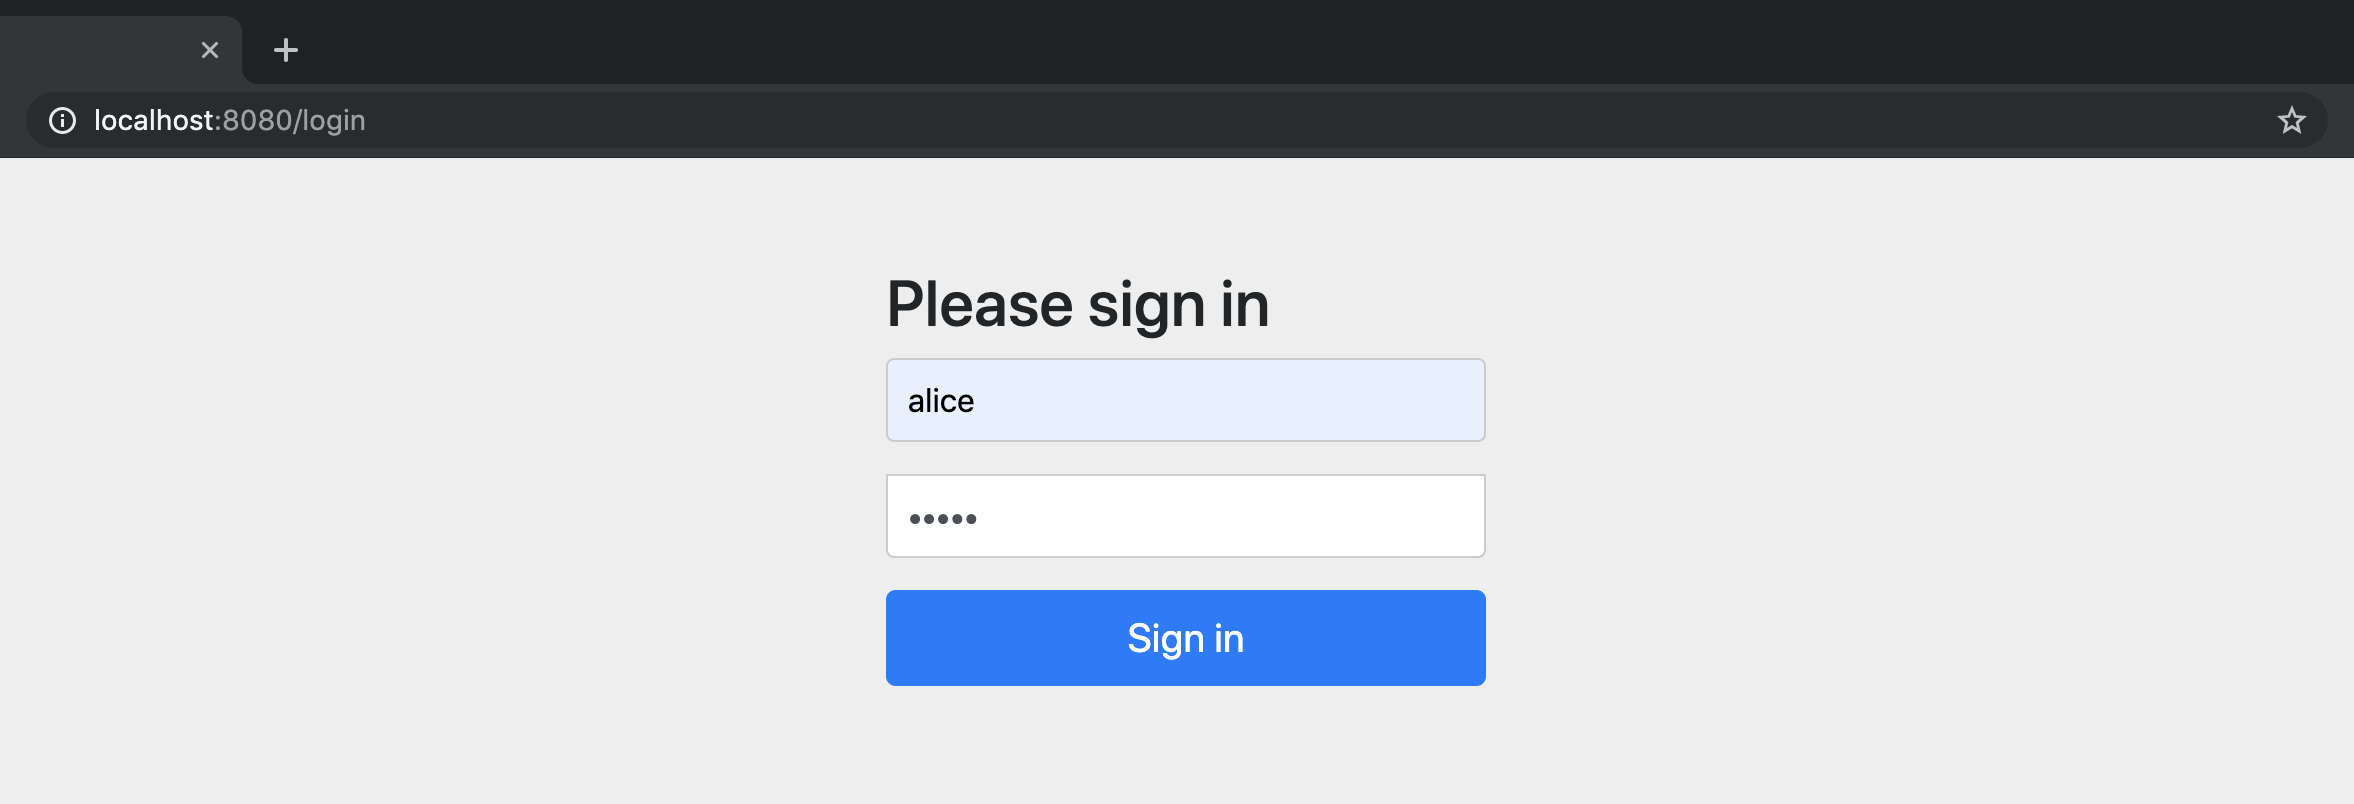
现在,我们打开浏览器,来看看授权码授权的过程。
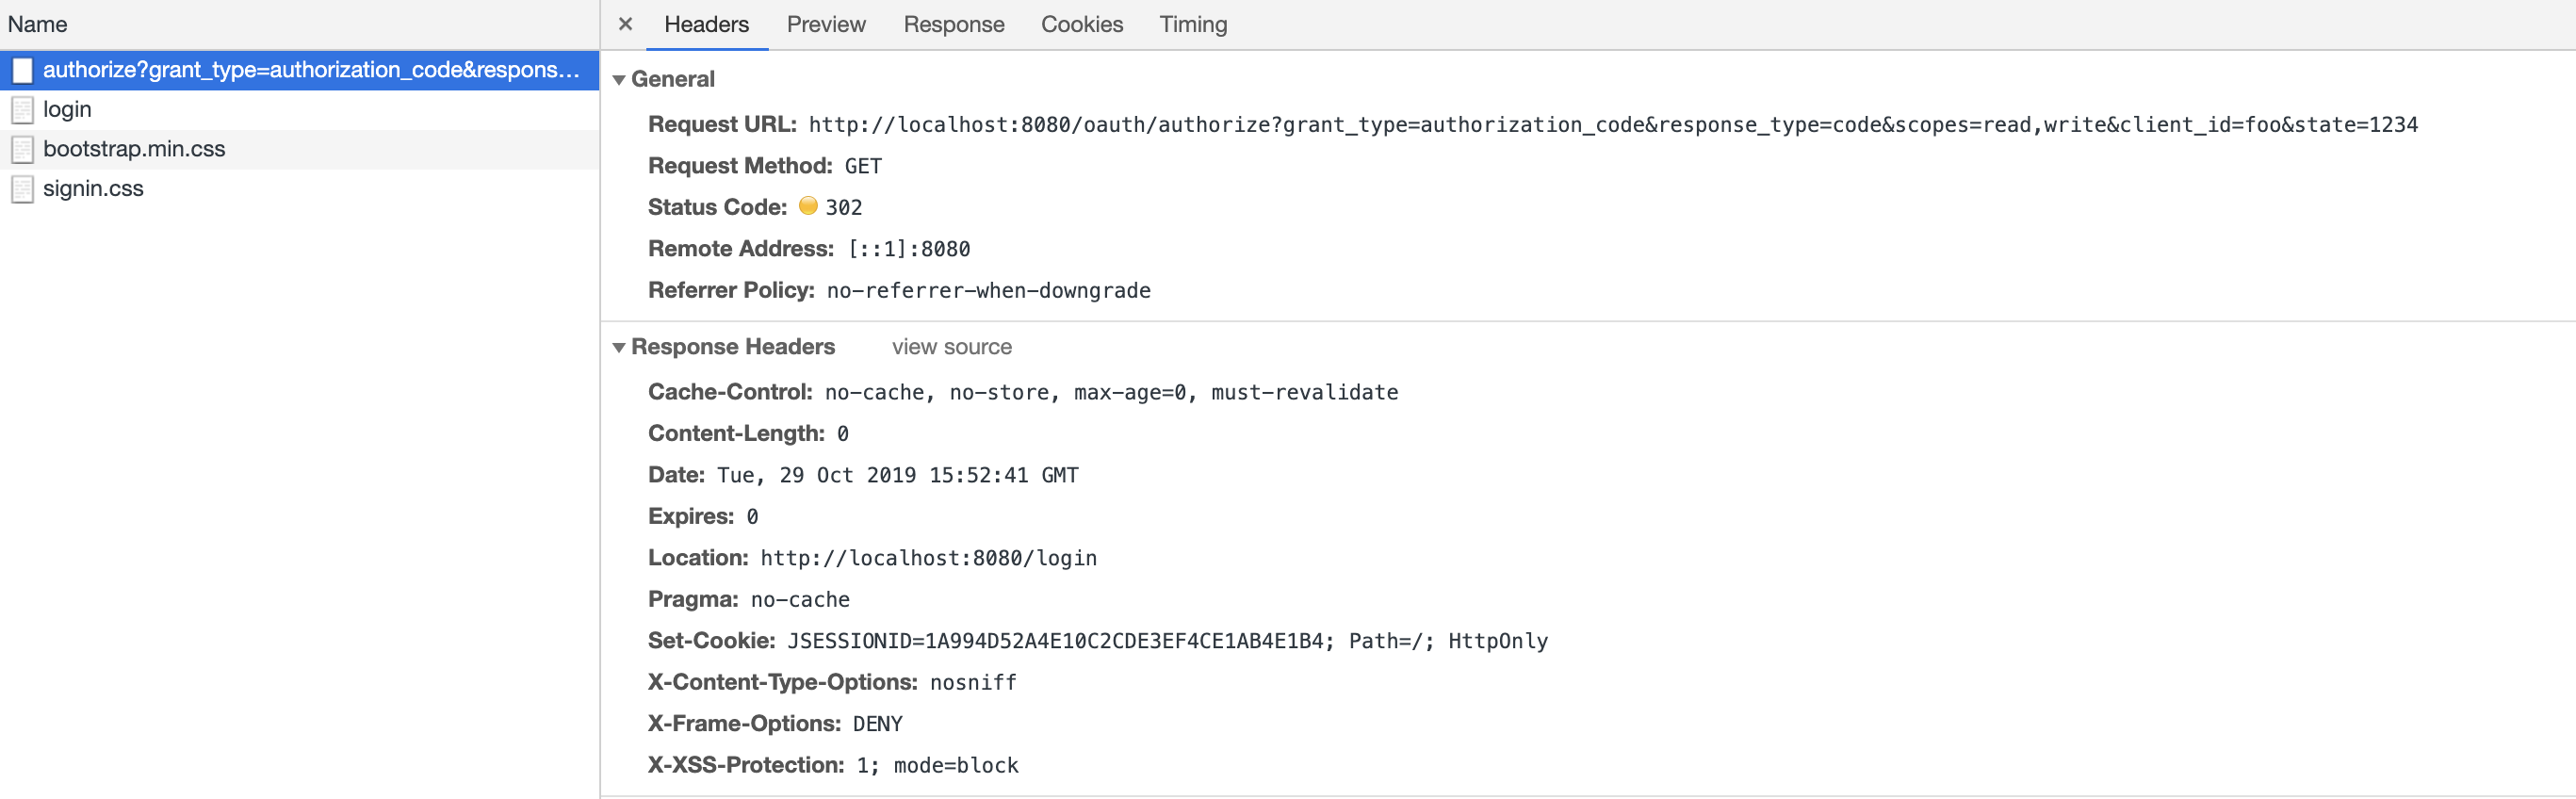
在浏览器地址栏输入:http://localhost:8080/oauth/authorize?grant_type=authorization_code&response_type=code&scopes=read,write&client_id=foo&state=1234
接下来,你会发现页面会自动跳转到 localhost:8080/login,这是因为我们配置的 authenticationManager 是应用自身默认提供的,采用的也是默认的 formLogin。
这是对应的重定向响应截图:
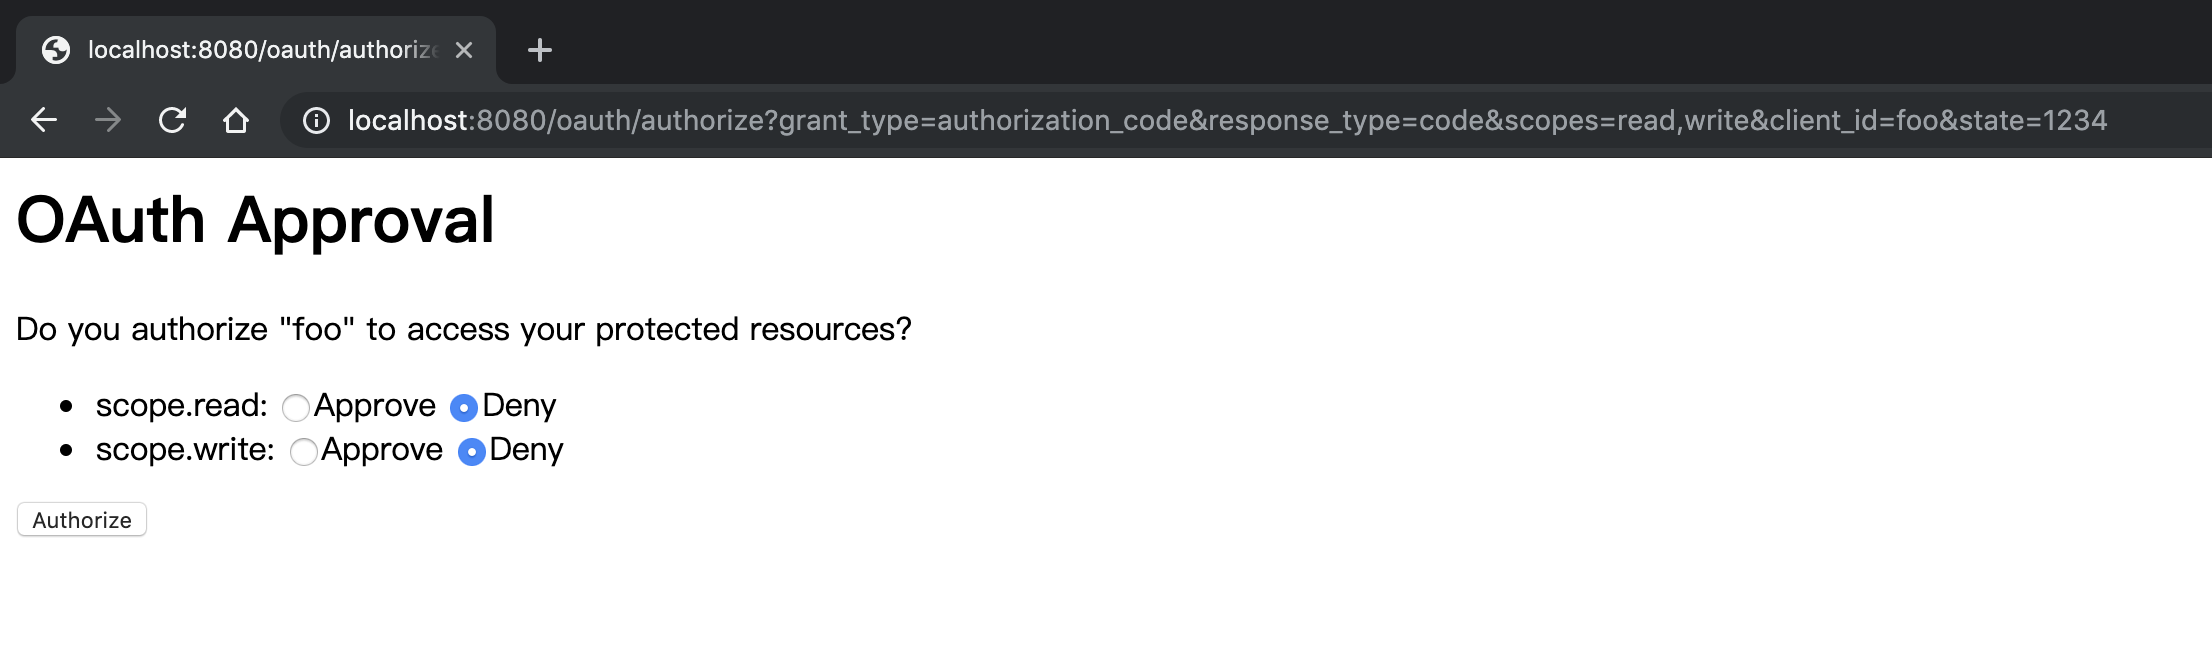
我们使用预设的 alice 账号登录,成功后会跳转到默认提供的授权页面,如下图所示,由于我们在授权请求中提交了 2 个 scope,这里可以分别授权:
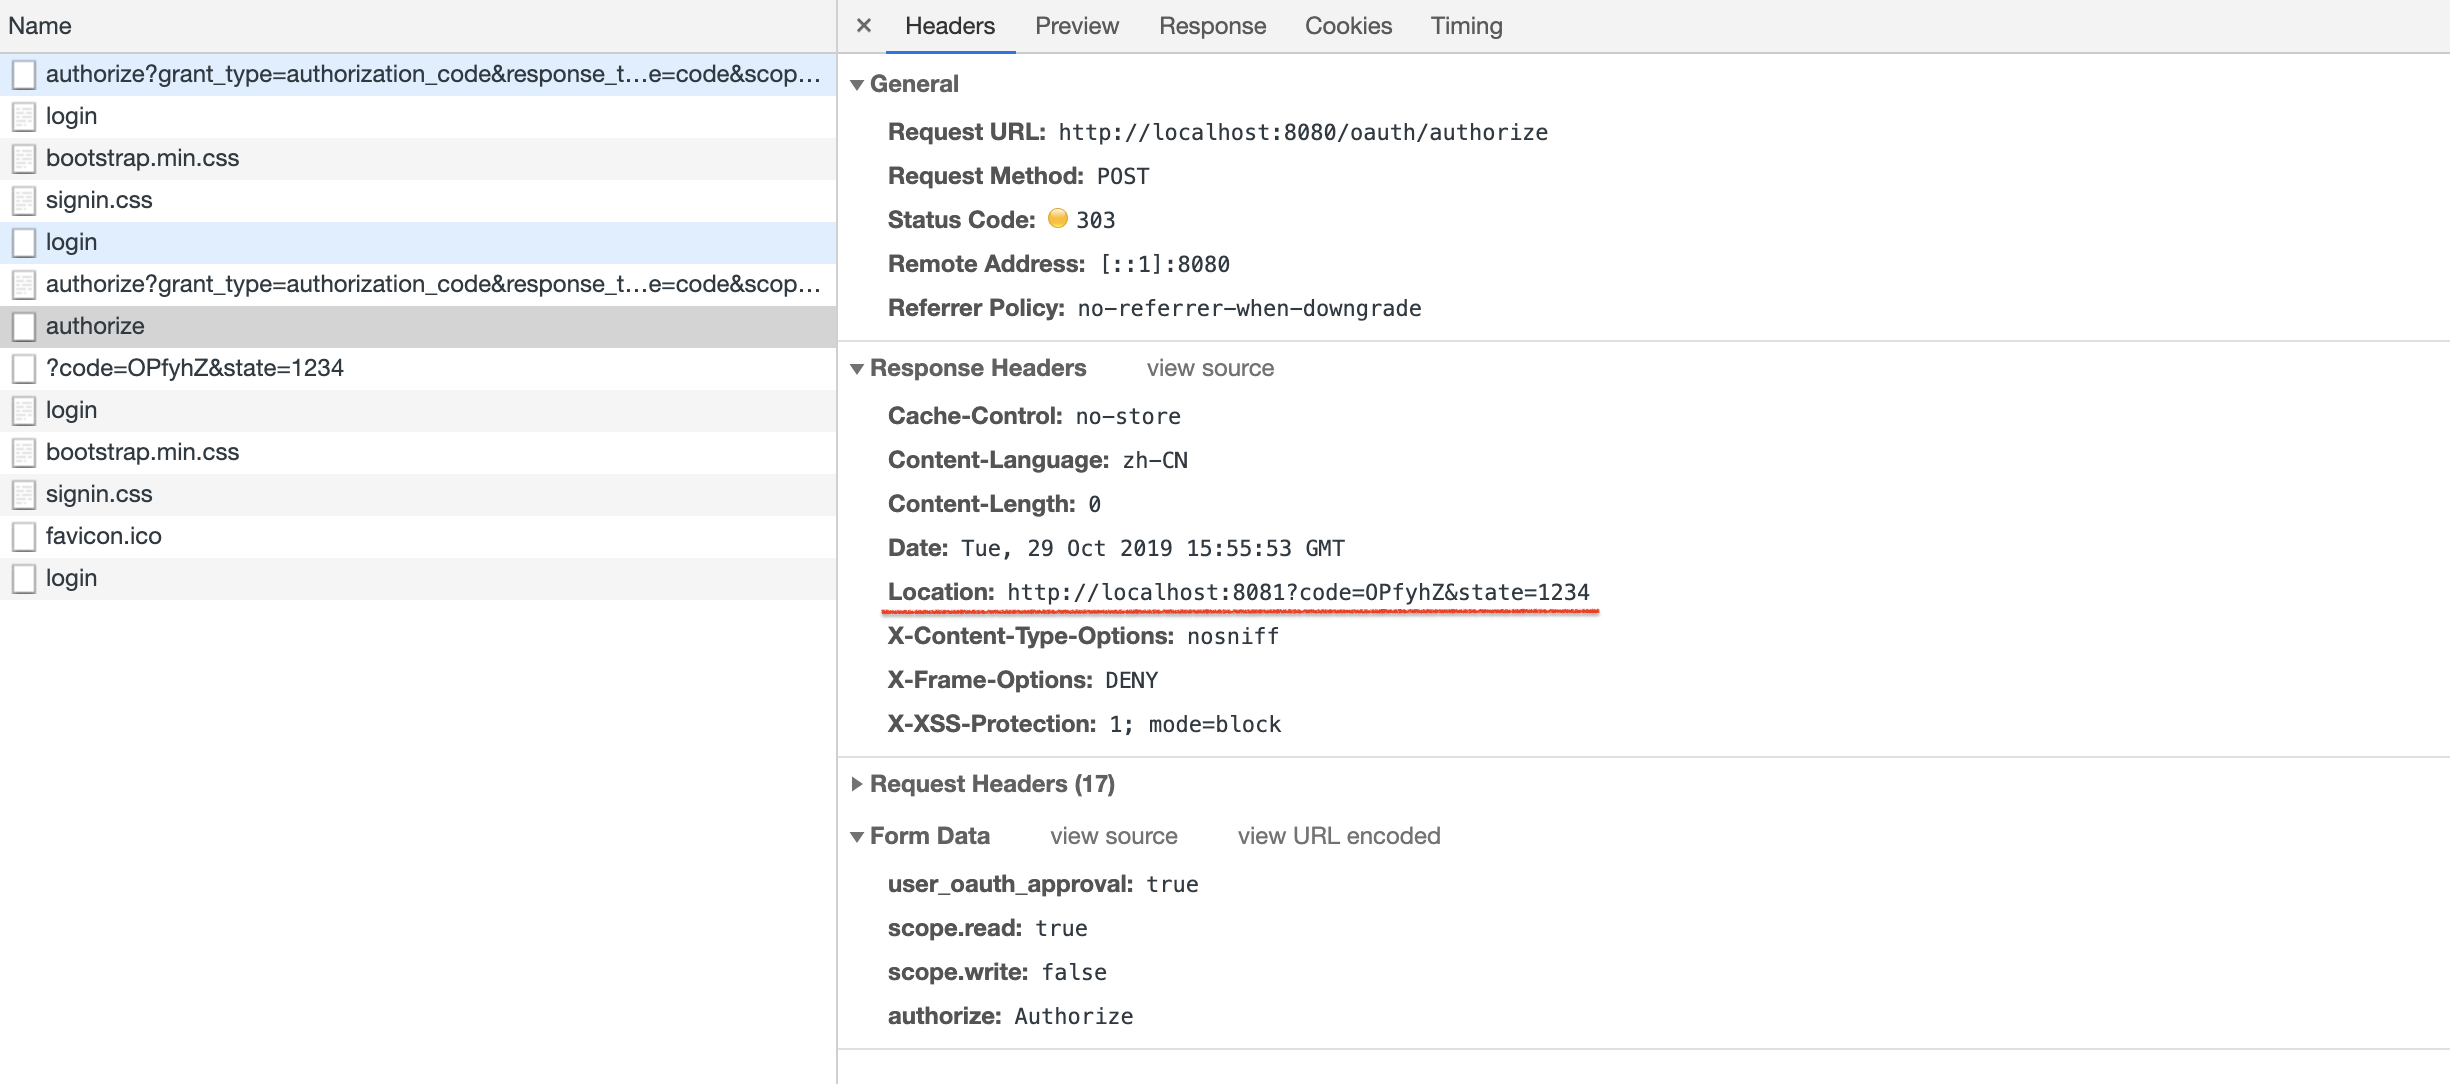
用户同意部分授权,授权请求发送给服务器,服务器验证后生成授权码,并将其作为重定向 URL 参数传递给客户端。可以看到,重定向 URL 为 localhost:8081?code=OPfyhZ&state=1234,正是我们在注册客户端时为其配置的重定向 URL。
到目前为止,localhost:8081 还只是一个普通的 Spring Boot 项目,我们还没有将其实现为 OAuth 2.0 客户端,所以它还不知道要怎么获取 Access Token。
可是,此刻真的很想提前体验一把完整的 获得授权 - 获取 Access Token - 访问资源 的这个过程呢,没关系,我们还有 Postman。
使用 Postman 向资源服务器请求资源,并选择认证模式为 OAuth 2,然后我们可以在 Get New Access Token 里配置获取 Token 需要的信息,如下所示: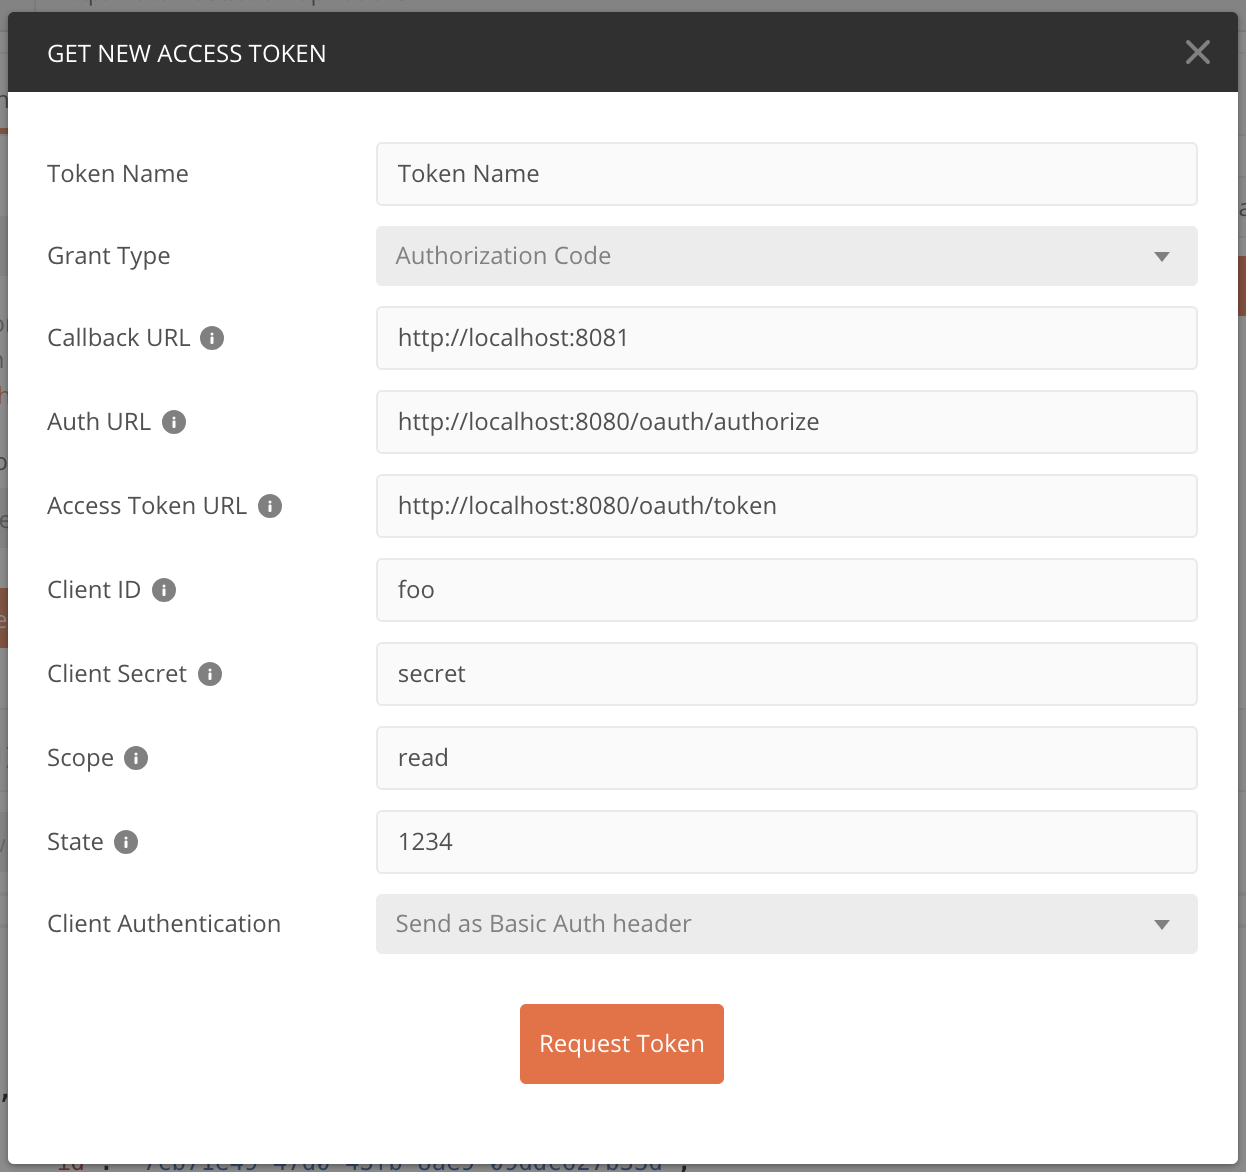
点击 Request Token 获取 Access Token,然后发送请求,Postman 就可以作为一个 OAuth 2 客户端访问我们的资源服务器了。
结果如下图所示: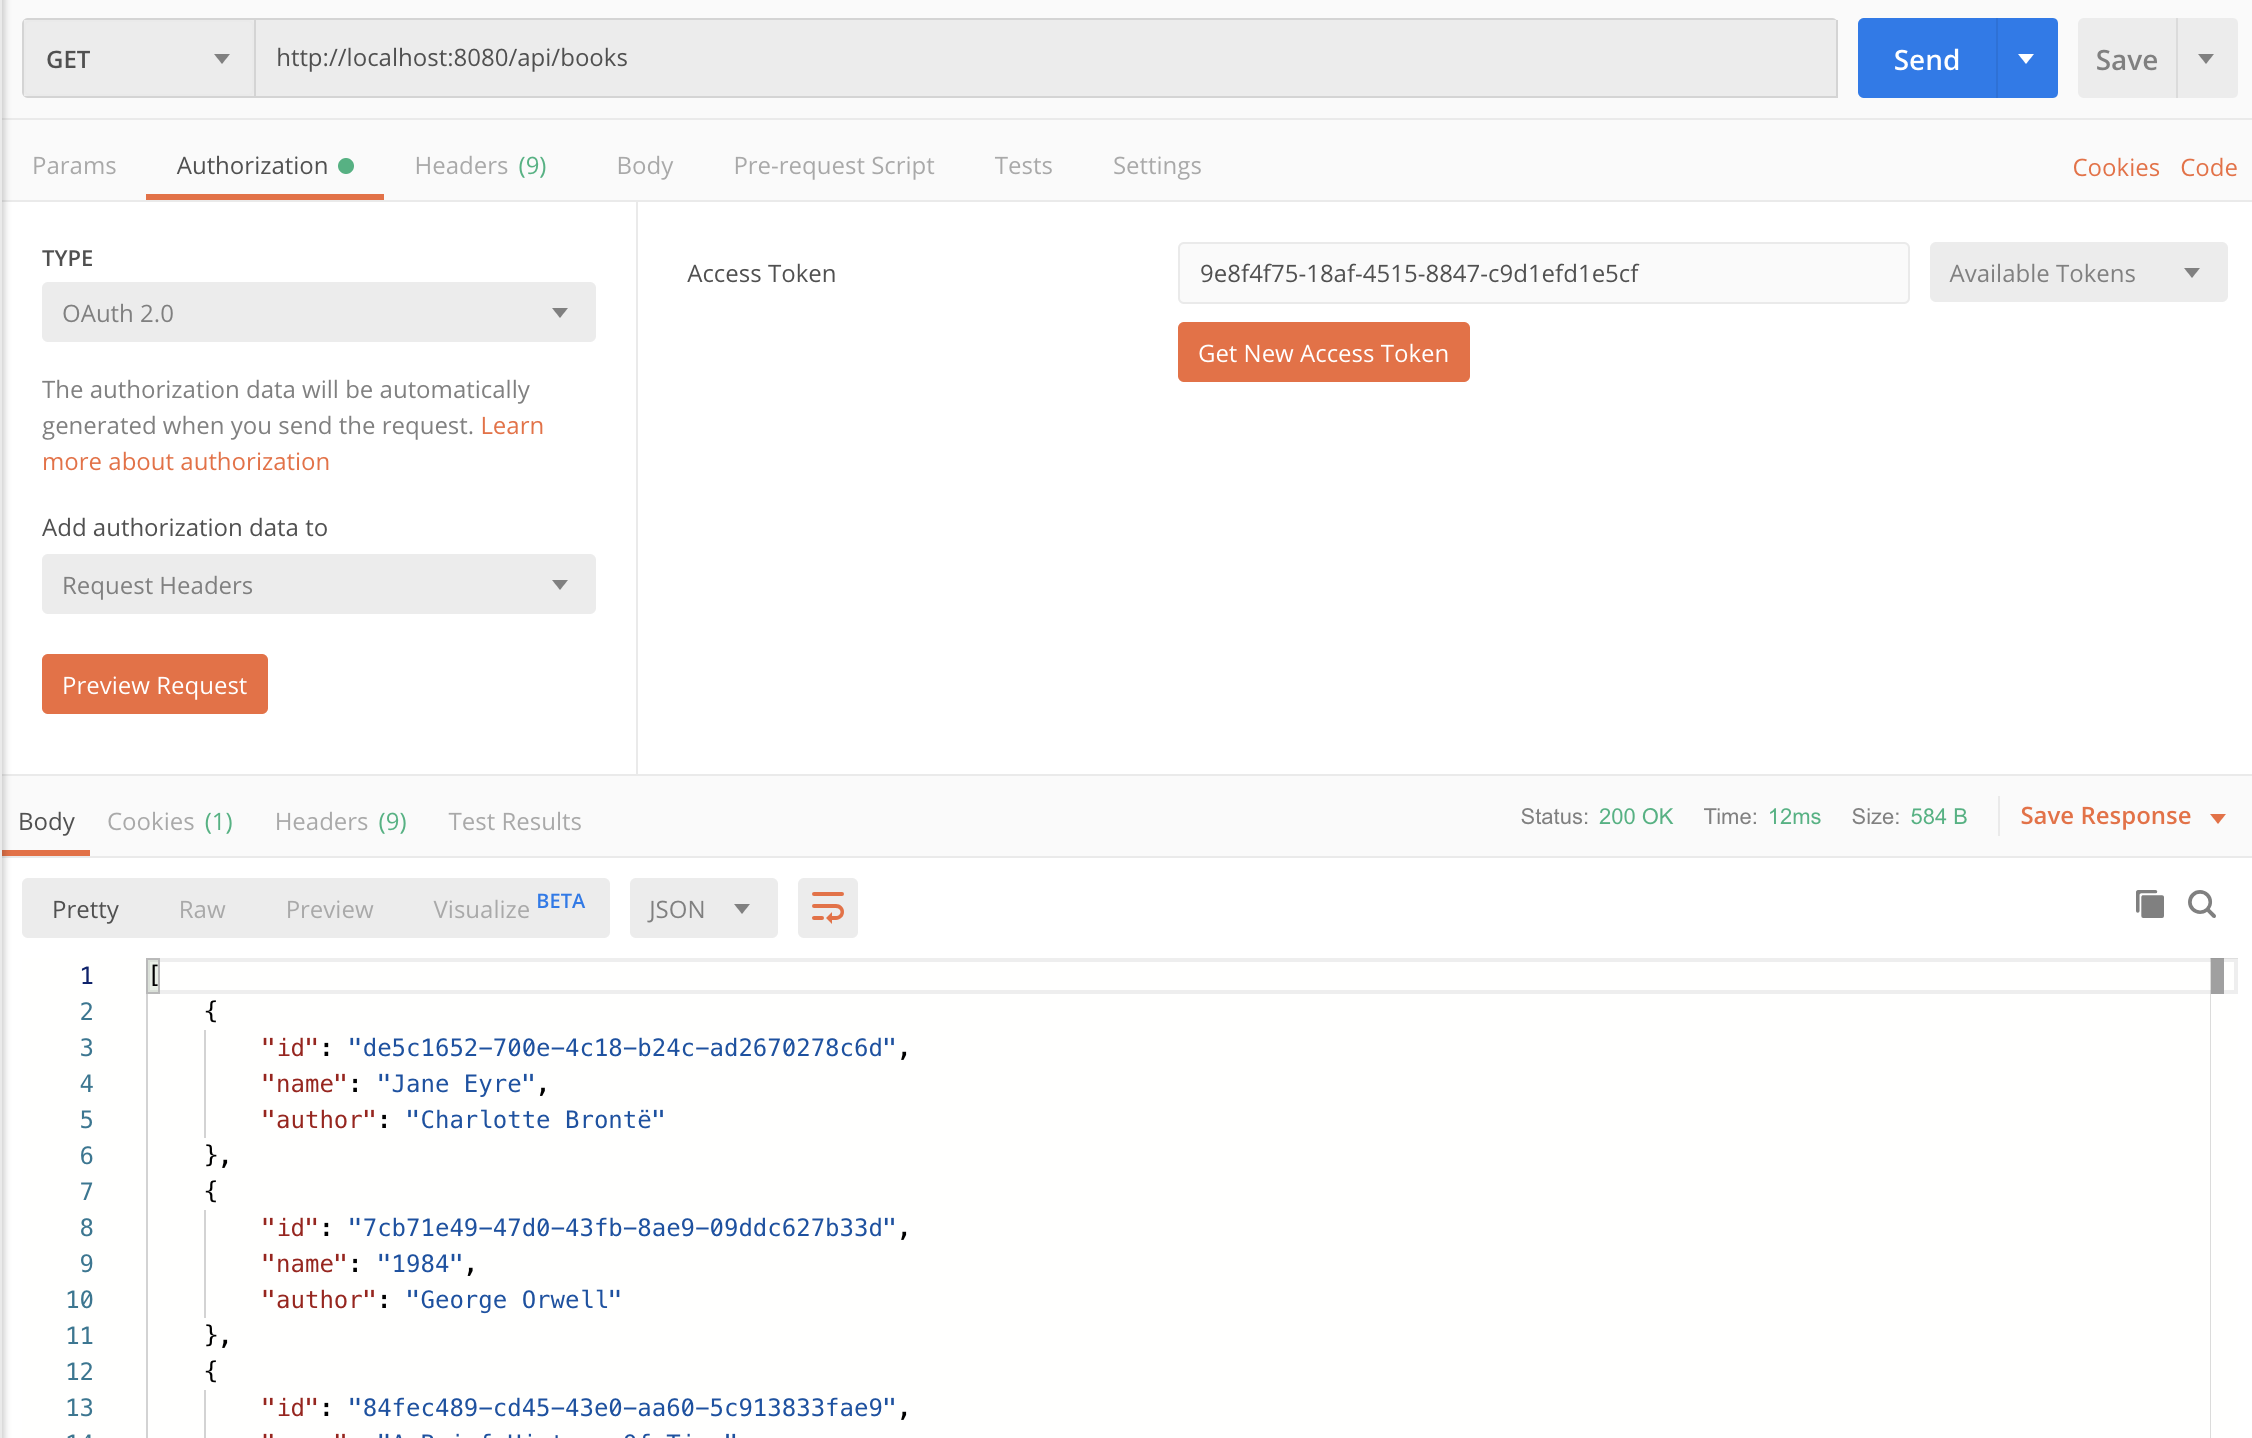
到此为止,我们的 OAuth 2 服务器已经运转起来,那么,OAuth 2 客户端又要如何实现呢?
未完待续~
参考资料